photo 1-home-1.jpg photo 2-about.jpg photo 3-sponsor.jpg photo 4-faq.jpg
 photo header.jpg

Saturday, 31 October 2009

Hocus Pocus and Alakazam!


Here at GlitterStitch HQ, we never miss a festivity, so as you can imagine we are rarring to go this Halloween.
Pumpkin? Check. Sweets? Check. Decorations? Check.

Wishing you a frightfully good night!

Toodlepip! xx

Wednesday, 28 October 2009

Keeping the home fires burning

Just a quickie after Monday's mammouth article.

I just wanted to prove to you that all my little sparkly projects do find little sparkly homes and become valued members of my sparkly little life.


As this photograph shows, my gold glittered pine cones now reside in my gold framed fireplace. Splendid.

At this time of year, in my neck of the woods, it's not quite cold enough to have the fire on but I would like to have a Autumnul feel to the living room. I like to think that my glittery pine cones simulate a firey effect and also add a touch of pizzazz (yes, I did just say "pizzazz") to an otherwise plain place.

The little postcard above was from Stowe Craft fair, and although you can't see in this shot, it has a gorgeous crinkle cut round the edge and and almost 'white wash' effect to it. For 50p, it would have been a crime not to snap it up!

I hope you too are finding new places to add a sprinkle of glitter.

Toodlepip! xx

Monday, 26 October 2009

Saturday Sparkle at Stowe Christmas Craft Fair

Firstly, brace yourself. We have a lot of ground to cover and this is set to be a long blogerroo article. So much to tell, so little time!

Secondly, as my late Mother would say, "Let's get this show on the road!".
This Saturday, our craft hunt took us (myself, the fiance, the Issobelle and the Amy) to Stowe Christmas Craft fair. As a keen believer in the magic of Christmas, and of course my luurrvvee of crafts, this kind of event is right up my alley!

As you have probably already guessed, this article will be a combination of the stalls I enjoyed the most, the bits and bobs I bought and a couple of extras to add a sprinkle of glitter.

Pictured above are the business cards of the vendors that I thought had the best stands. My measure of "best" is whether it is appealing to the eye (although they do say that beauty is in the eye of the beholder), the types of products they sold, or the price- a key element for a craft addict myself! All these gorgeous knick-knacks soon add up! Eek! I think if you click on the image above, it will magnify and you might be able to read the business cards. If it doesn't work, I apologise, after many tries at this shot, this was the best. Should you want any further information regarding them, pop a comment at the bottom and I'll happily give you any details :). Golly gosh, that all sounded rather professional!!
As you can see above and below, here are a few of stalls that I thought were fantabbydosey!


The Rebel Rocks stall was a fantastic array of individually designed rings, all at only £35 (NB this might have been a special offer for the day, so don't quote me on it!) and all exquisite. All the rings had a sort of chunkyjewelness to them that I enjoy in a ring (they balance out my chunky fingers haha) and theyoozed quality. If I hadn't had spent all my money, I would have bought the stall up! Comment below if you would like the website details etc because I definitely think these would be well worth considering for gifts or even to reward yourself for a hard days work reading my blog! Woop!


Flowerstalk was another fantastic stall that had a fabulous range of table centre pieces and floral displays. To be frank (ahh that made me think of a super Frank I used to work with. I'm going to pop him on my Micro Happy list because he made me smile everyday, without fail. If you're reading Frank- I miss your Dad jokes and hideous 'music'), so back to the matter at hand, to be frank, I'm not actually a 'flower person', but these were brilliant. All the displays/centre pieces were wonderfully contemporary with glitter and candles and I would be happy to invite these to a dinner party! The chap on the stand was super as well- very happy to let me take pictures so that gets a thumbs up in my book! Thankyou Mr Flowerstalk Man! Again, if you would like details, comment below.


Last but absolutely not least, the stall I spent a small fortune at, was Bloomin'fab. The stall was full of cool plaques and little hangy jobbies (another of my official terms there) and there were quite a few that could be personalised. I have had a little look at the Blooin'fab website and it seems very userfriendly (ideal for people like me- this blog is about as technical as I get). Comment for details.
Okie cokie, on to the fun bit- the treasure I took home! Hurrah Huzzah!
I shall resist commenting on all the pictures, I'll let you gorge on the beauties and feel smug that they are now nestled in my little home, all happy and merry-tehehe :) .


I know I said I wouldn't, but I HAD to! I'm commenting! This bird ornament was from the At Home... stall. At Home... is a shop in Buckingham and their stall was fab too. This bird is metal and very heavy, hence the leather stringy bit- cotton would just snap, and was too gorgeous not to be bought. I think lilac birdie is meant to be a christmas tree decoration but he has already flown into my lounge and I suspect will be staying there. Tweet tweet.


All in all, I would say Stowe Christmas Craft Fair was another fab day. The stalls were super, the setting was spectacular, and as this pictures suggest, Issobelle would rate it 10 out of 10 too! I think the clenched wrists cake picture says "Oooooohh yeeesssss I luuurrrvvee cake", and she was immensely pleased with her face paint, proudly telling me her makeup looked much better than mine! Little gem!


Thanks for reading this epic today, I hope you enjoyed it.
Toodlepip! xx

Saturday, 24 October 2009

I Heart Buttons!

Just as the Beads, Buttons and a Sprinkle of Glitter title would suggest, buttons are one of my joys. Never mind making me micro happy, they make me massive happy! So, dear reader, imagine my super duper excitement when I found a little box of buttons my marvellous Grandma gave me a few years back. I had lost them, and then my some mystical buttony force, I found them in my junk room and immediately started thinking about what I could make with my little gems.


After much deliberation, I decided to make this hanging button heart to add a touch of button love to my new home.

In my unprofessional opinion, its the little touches that do it- The large touches make a house, but the little touches make a home :) . By filling my home with handmade goodies, it's like filling my home with care, love and time taken to create. Mmmmm handmadeness.


These are the steps I took to make my hanging button heart, but of course, you can adapt and alter as you please.

1. Like a magpie, search for all the colours you like and group together approximately 20-25 buttons of a similar size. This is the step you can personalise the most- for bigger or smaller hearts use more or less buttons, and for a quirky feel you could try different sized or even different shaped buttons.

2. Cut a length of wire (I used beading wire with a 34 gauge, but that was just because I had it to hand. Next time I will try a slightly more sturdy wire as this was a little too flimsy for my liking) about 30cm long. This will not be the circumference of your heart but it's better to have a little extra and then you can trim the ends.

3. Thread on your first button to the bottom of the wire, leaving a 5-8cm 'tail', as you will use this to secure the strand at the end of your project.

4. Thread the wire through one hole of the first button, threading from behind, bring it through, thread it back out from in front, through the adjacent hole. Did that make any sense? It did to me but reading it back it sounds more tricky than it is. Hmmmm, comment if this causes you any real problems and I'll try and explain it better (chance is a fine thing!).

4. Do this threading technique with all your buttons.

5. When you have threaded all your buttons, twizzle the ends of the wire together, quite tightly, so that you have a wirey buttony circle, and trim off any excess.

6. Shape the wire circle into a heart (or any shape you fancy) and attach ribbon, wire or string for hanging. I used wire again, purely because it was to hand, and attached it to the top of the heart by wrapping the wire round the buttony wire a couple of times.

Taaddaaaaa!! A little touch of button love.

Toodlepip! xx

The Puuuurrrfect Photograph

This was too good a shot of camera-shy Mindycat to not go on my bloggeroo. What do you think she is thinking?


Enjoy!

Toodlepip! xx

Friday, 23 October 2009

Perfect Pine cones

As avid followers will remember from my conker post way back when, I'm a keen believer in bringing nature into the home to create a eco friendly yet attractive focal point for a room. Last month I had my blue vase conker display and this was all the rage in the land of the porch, but just like the song that goes "for every season turn, turn, turn", my conkers turned and grew fur. This was when I knew it was time to say "Buhbye Cool Conkers, Hello Pretty Pine cones!".

On a recent visit to Daddy-GlitterStitch, myself, Amy and Issobelle collected 2 huuuuuge bags of pine cones, took them home and set to work!


To give your pine cones a sparkly outfit, complete the following instructions (as usual, this is a simple project and you can do it a variety of ways, this is just the way I tackled it):


1. Make a mixture of one part water, one part pva glue and one part gold paint (I use the kiddie friendly kind- my cream carpets prefer it).

2. Hold naked pine cone ready for his new outfit but first- very important- shake it and blow it because Amy nearly died of fright when Mr Spider crawled out and attacked her. Loud screaming ensued and this was not conducive to my little glue-glitter-shake system!

3. With a toothbrush or a washing up brush jobby, roughly coat the cone in the glue mixture.

4. Pass the gluey pine cone to a consenting chum and sprinkle generously with glitter. We opted for gold for a rich feeling but this is obviously a matter of personal choice.

5. Tip of excess glitter and leave to dry.


Et voila! Sparkly gold affordable luxury!


Toodlepip! xx

Vintage Tea Party

Today was one of those special days that you just know that in 5 years time, you will look back and think "That was a nice moment" and smile to yourself at the sparkly little memory- I call these 'Mental Gems'. A memory that you cherish, that brings a smile to your face and a warm fuzzy to your heart. Call me smooshy but there we are- its another one (along with my love for fridge fronts), that I tend to keep on the down loooow.


Anyway, today all three Aunties, Judith, Jackie and Rosey-Posey-Timble-Tosey, came round for tea and cakes and I like to think I stepped up to the mark. Out came the vintage plates that were left to me by my beautiful Mother (Diana Jane) and on went the oven for a variety of home baked goodies. Ok, you caught me, that's not 100% true. I did dig out my vintage china from my Mummy, but I might not have actually made the mini apple pies and sponge cakes. It is possible that the helpful staff at Morrisons did that part. Tehe.


After tea and cakes on delightful plates (nearly poetry there), a little auntie shaped birdie told me that I have a secret blog follower. I have known my secret blog follower all her life and used to play with her and her big sister in the summer house in their garden and at my cousin's house. Well please secret follower, will you become a public follower (click "follow" option at side of page and follow instructions to create a google account- tres tres simple chum) and let yourself be known! As a little thank you to you for following, please enjoy this picture :)


A bit of a waffly bloggeroo today but I wanted to share my vintagey things with you (they make me micro happy) and also wanted to say "Thank you Kindly Following Chums" to everyone who takes the time to read!

Toodlepip! xx

Tuesday, 20 October 2009

Microhunting for happiness

It is a known fact that us humans are constantly on the hunt for happiness. Is it fast cars and a big house? Is it fame? Is it family? Well who knows!!?

Inspired by the book I am reading at the mo (see previous posts), I'm on the search for mini happiness. So with that in mind, on Sunday, I snapped a variety of little things that made me happy and brought me pleasure. I hope my pleasure is also yours.


This mini person on this great rustic rowing boat was a photoshoot not to be missed!


I spotted these curtain tassels in an interior design shop and was drawn to the jewel-like tones of them. The are nothing more than metal, plastic and coloured threads but they seem to exude a certain richness.


This is the handle of a knife and fork in a quaint country cafe and I couldn't resist snapping their ornateness. Fancy Shmancy.


The front of this antique shop is one of the best shop fronts I have ever seen. Its so full of frivolity that it makes me want to rush and see what treasures lay within.


As you know, my penchant for buttons runs deep so not taking a close up of this fabulous cushion would have been a crime to me!
Hope you enjoyed reading and you micro liked my micro hunt!
Toodlepip! xx


Monday, 19 October 2009

A sweet treat


Embracing the beader within, I hopped onto ETSY (the greatest place ever for handmade items) and made an online order for some very cute cupcake inspired beads. The like fimo bead charms are shaped into cookies, oreas, poptarts, multicoloured cupcakes, gumball machines and many more.


I wanted my bracelets to be as bright and fun as possible and so I chose a round fuchsia bead, elastic string (I usually use Nymo thread for beading but as this is only beads strung on in a line, the nymo wasn't necessary) and of course, my candy charms.


These are so scrummy I'm including photographs of them, a couple modelled on a very excited Issobelle, who would like you to know the charms are just "pwetend sweets", so don't eat them! Ahhh.
I will be selling these bracelets for £4.50 for a 4 charmed item and £5.50 for a 6 charmed item. Chilrdren's bracelets have 3 charms and are £3.50. Contact/leave a comment if interested. :)

Toodlepip! xx

My glass is half full. Is yours?

Yesterday, as usual, I went on the hunt for a Craft Fair and lo and behold, Amy, Izzy and I found one! Hurrah! This week it was at Woburn and I thought I would share with you my favourite stand from the fair.


L J Boy Stained Glass was by far the most beautiful stall with a range of handcrafted glass products ranging from coasters to cuff links and everything in between (please comment if you would contact details of this vendor).


Whilst at the stand, I was like a kid in a sweet shop and ended up buying the A-MAZING coaster, pictured above, for £5 (wishing I had bought more now grrr), a very cute blue star and an equally cute green star for £3 each and a long purply/bluey type hanging jobby (another technical phrase there). I am so besotted with my shiny gems that I shall be posting the pictures below.


I was told by the lady who ran the stall that the little £3 stars, which I thought was a very reasonable price by the by, actually have a different type of glass in each of the 5 triangle sections- Wowza!
If ever you have the opportunity to visit this craft stand, do it! You wont regret it :)


Toodlepip! xx

Sunday, 18 October 2009

.....and one for the little boy who lived down the lane


Once again, not very beads or buttons but definitely a sprinkle of glitter.

On my regular Sunday Sparkle day (more on that later), we parked a little out of the village and I was filled with glee when I saw what road we were parked on. Issobelle was tickled by it too.

Hope you're weekend was filled with as much glee as "Duck Lane" was as we walked down it.

Toodlepip! xx

T Time

Way back when Little Sister and I did our glitter hand print canvass, I let her loose with a mini canvass and some gold glitter. Naturally (sorry Tiyana!) she messed it up, despite her good intentions, and it became a pink canvass with a funny almost star shaped glitter splodge.

"Waste not, want not!", I hear you cry! Well boys and girls, waste I did not!


I smothered (mmm lovely word is "smothered") the pink part of the canvass in PVA and covered with gold glitter, so the odd looking splodge was a thing of the past. Once this had dried, I roughly covered the edges in black glitter to conceal the pink perimeter and give a bit on an edge to the canvass. An edge on the edge haha.

Then, as a centrepiece, I cut out a card "T", black glittered it and placed it in the middle. Super!

Maybe one day I'll get round to the "iyana" to her "T".

Toodlepip! xx

Thursday, 15 October 2009

Thanking you Miss Louise K

This morning I opened my fb account and saw the little '1' next to the word 'inbox'. I always feel secretly excited when this happens because you never know who it's going to be from and what it will be. For a split second there is the element of surprise and curiosity and I like this feeling a lot.


It turned out I was right to be excited as it was a lovely message from my best bud's big sister Louise K and she said she enjoyed reading this blog lots, so to Louise K I say "Thank you" and dedicate this little article and picture to you. :)


Thank you for reading.


Toodlepip! xx

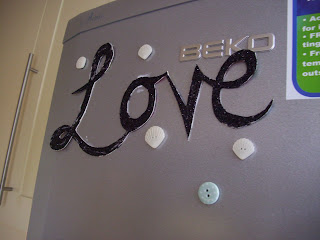
Je t'aime

Egged on by my new fridge (get it- eggs, fridge, eggs in fridge..tehe), I knew more was needed on the magnet front. I'm a huuuggee fan of fridges, this is my secret shame that I don't openly tell people. It's a bit weird you see, "Hi, How's it going? Yeeaahh yeeaahh fine, I love my fridge, work is going well, weathers a bit dull" etc etc, it attracts funny looks and the like. Anyway, I love my fridge not just because it is a treasure chest of yummy foods, but because it is an open invitation to stick whatever you feel to it and know that it is changeable. In our old flat, our fridge front "evolved" with the passing months and gradually became a real work of art with everything you can imagine on it. I'm looking forward to watching the evolution of my new big girl fridge too.


So with that in mind, I located my cream card, cutting board, crafty knife, glue and black glitter (mmmmm black glitter) and set to work. I doodled the word "Love" the card in girly writing - there really is a noticeable difference between girls' and boys' handwriting isn't there? - and thickened it out a little. I very carefully cut it out, smothered it in lashings of glue and sprinkled the glitter on.


Now, Matthew the fiance look away now, I couldn't find the little strips of magnets I KNOW I have somewhere and my impatience got the better of me, so I did something very naughty and ...sssshhhhh dont tell....glued my Love Plaque to the fridge door. Never do this. Partners will get cross!
After the shock of my glue crime, I looked upon it and thought "yes, I love my Love". As it happens, Issobelle loved the Love as well and created another beauty for the kitchen.


Despite being brilliant, I perhaps wont actually glue this to anything! Aww.

Toodlepip! xx

Tuesday, 13 October 2009

On your marks, get set, GO

About 20 pages in, I was absolutely besotted with my latest read (The Goddess Guide) and felt that such a beautiful book deserved an equally beautiful bookmark.
As promised in my earlier blog (Sunday Sparkle at Lamport Hall Craft Fair), I had bought some super duper big beads and lovely ribbon and had it in mind that they were a match made in heaven- in book heaven!
To make these yourself, cut a length of thread somewhat longer than the standard book as you can always trim to suit. Then, thread on your selected beads in any fashion you choose, tie nots on each sides of your beads to keep them in place and Bob's your Uncle- a gorgeous glass bead bookmark. You could try spicing things up a bit by using more than one piece of ribbon on each bookmark and perhaps plaiting it.
Next time I buy someone a book for a birthday or Christmas present, I'll be popping one of these in as an extra sweetener. A book is naked without its mark.
Toodlepip! xx

Man Beads Grr!

For the past few days we've had our guitar loving friend friend Anthony staying with us and it was music to my ears when he said "Do you have any beads?". Ooooooh yes I certainly do- just about every sort of bead you can imagine my little chum! Woohoo! He subsequently requested a "manly" bracelet with my little glass seed beads and so I got cracking!


I've never made a "manly" bracelet before and being the ultimate girly girl I had a challenge on my hands to not choose pink and glitter. I settled for black, brown and forest green (hehe the forest green beads have a slight shimmer to them but he wont notice and I got my glitter fix- phew).


I used a seed bead needle, black nymo, a silver plated twisty clasp and size 11 beads and simply strung the beads on the nymo thread and strengthened around the clasp. I doubled up the nymo for extra manly sturdyness ("sturdy" is a rather manly word isn't it?!) and voila- a man bracelet...maybe a mracelet? haha.

Brownie Points if you can work out what the mracelet is having its photoshoot on...

Toodlepip! xx

Monday, 12 October 2009

A Smart Smartie

A very short post for you here- less is more and all that jazz.


A good book (The Goddess Experience by Gisele Scanlon, well worth a read) and a box of smarties. I promise I didn't engineer this photo, the smarties fell and I thought it looked so scrummy that I had to snap it.


Good times.


Toodlepip! xx

Sunday Sparkle at Lamport Hall Craft Fair

Sundays in our house recently have become a day for DIY stores, organising the new kitchen, picking tiles, choosing paints and relaying carpets. Whilst these tasks have a good purpose and will lead to the my house becoming a palace, they don't feel me with that fizzy feeling glitter and beads and shiny ornaments do. So when my Auntie Judith invited me to Lamport Hall Craft Fair on Sunday, I jumped at the opportunity.

There is something very special about craft fairs. I always get caught up with all the lovely handcrafted knickknacks and enjoy the way the sellers are willing to talk to you about the items they have put so much effort in to. As well as a fantastic shopping experience, Craft Fairs are a place for inspiration to strike at every corner! As I wandered round with Izzy and Auntie Judith I though of so many projects I want to get going on and felt reinvigorated. I also felt a little dizzy with all the money I spent on lots of gorgeous crafty things, some of which I have photographed and scattered in this bloggero article.
This stall (Tickly Spider, please leave a comment if you would like their details) were fantastic! They had a range of wooden hanging sign jobbies, the little clay (I think clay anyway) gingerbread man tree decorations (£1.50 each) and huge wooden letters. As I chatted to the lady, she mentioned that they customise and do items to order. Music to my ears! My little sister, Tiyana, has the most unusual name and I can obv never find anything named for her. For only £4.50 I bought this fabulous lilac hanging heart which the lady wrote "Tiyana" on one side and "Louise" on the other- the perfect (and very reasonable priced) Christmas stocking gift. I strongly recommend looking them up!

This little rabbit (£3.50) will be hopping into Sophie's Christmas stocking and these FANTASTIC vintage baubles (a mere £1 each) will be taking centre stage on my tree. Woop!
Watch this space for exciting bead and ribbon projects :) .
The icing on the cake of the fair was the fun Issobelle managed to have at every stand and with every display. Her highlights were deliberating for 10 minutes over a little mauve wind up kicky horse or a pink jumping rabbit- as you can see, she settled on the horsey and loved it so much she pinned it to the wall with a big kiss! Aww!!

And as you can see from her exploring little hands, the water beads went down a treat too! Apparently the pink ones felt best- "weally weaaaaalllyy squidgy".
I hope your Sunday was as inspirational as mine. Exciting new projects coming soon!

Toodlepip! xx
 photo newer.jpg  photo older.jpg  photo homebot.jpg